

Recently, I was asked this question:
Is it possible to put something like a timer on .ppt slides showing the time count down?
It is possible and there are several ways to do it. Some ways are more complicated than others.
I prefer to use something that is simple, quick to make and easy to edit.
Click on 20 Second Timers to download 7 templates .
I have also put together four step-by-step guides to make very simple timers that you can use with your presentations.
Parts of the Screen
The animation ribbon and the animation pane are both very important and will be used frequently when making timers. On the animation ribbon you will also see two boxes called animation duration and animation delay. Without these features, it wouldn’t be possible to create these timers. Take a look at the screenshot below if you want to see where they are located on the screen.

The selection pane is also a very important part of the PowerPoint. The image below shows you where you can find the menu on the home ribbon to open the selection pane.

Four different ways to create a timer in PowerPoint.
How to create a wheel timer in PowerPoint
Step One: Insert a doughnut shape and change its size, fill color, line color and add any desired effects.
Step Two: Select the shape and assign it an exit (red) animation. Go to the animations ribbon and select the wheel animation.
Step Three: On the animations ribbon, change the animation duration. Instead of 02:00 (2 Seconds), change it to 20:00 (20 Seconds).
Step Four: Open the animation pane and select start with previous. A zero (0) will appear next to the animation. This means the animation will begin automatically when the slide is shown.
Step Five: Start your presentation. Your timer will automatically start and the wheel will begin to disappear.
How to create a bar timer in PowerPoint
Step One: Insert a rounded rectangle and change its size. I chose a height of 1 cm and a width of 30 cm.
Step Two: On the format ribbon, click on align objects and select align objects center (with the align to slide option checked).
Step Three: Change the fill color, the line color and any desired effects.
Step Four: Copy the shape. Change the fill color but keep the same line color. Stack the new shape over the original shape.
Step Five: Go to the animation ribbon and select the exit (red) animation called wipe. Click on effect options to change the direction of the animation. Choose from left.
Step Six: Open the animation pane and select start with previous. A zero (0) will appear next to the animation. This means the animation will begin automatically when the slide is shown.
Step Seven: On the animations ribbon, change the animation duration. Instead of 02:00 (2 Seconds), change it to 20:00 (20 Seconds).
Step Eight: Start your presentation. Your timer will automatically start and the color of the bar will appear to change from the left.
How to create an hourglass timer in PowerPoint
Step One: Insert an isosceles triangle and change its size, fill color, line color and add any desired effects.
Step Two: Copy the shape and rotate it. Click on rotate objects and select flip vertical.
Step Three: Move the shape so both points of the triangles meet. Change the color of upper triangle.
Step Four: Select the upper triangle and go to the animation ribbon. Select the emphasis (yellow) animation called fill color. Click on effect options and choose the color of the lower triangle. Change the animation duration from 02:00 (2 Seconds) to 20:00 (20 Seconds).
Step Five: Select the lower triangle and go to the animation ribbon. Select the emphasis (yellow) animation called fill color. Click on effect options and choose the color of the upper triangle. Change the animation duration from 02:00 (2 Seconds) to 20:00 (20 Seconds).
Step Six: Open the animation pane and select start with previous for both animations. A zero (0) will appear next to the first animation. No number will be shown next to the second animation. They will happen at the same time.
Step Seven: Start your presentation. Your timer will automatically start and the color from the upper triangle will change and appear in the lower triangle as if it were an hour glass.
How to create a numerical countdown timer in PowerPoint
Step One: Insert a shape and change its size, fill color, line color and add any desired effects. In the video I have used a circle but you can use any shape.
Circles, Rectangles and Diamonds are common shapes for a timer. However, you could
also use a thought bubble (cloud callout) to show how much thinking time there is,
or a speech bubble (oval callout) to show how long someone should speak for.
Step Two: Insert text into your shape. Click on your shape, then go to the insert ribbon. Click on draw horizontal text box and then click on your shape again. A cursor appears. Type in the number 20 and format your text by choosing the text size and color. Delete 20 and replace it with 0. (The reason for doing this is to make sure double digits fit within your shape.)
Step Three: Copy your shape several times. If you are making a 20 second timer, you need to copy the shape 20 times. The easiest way to do this is to hold down CTRL and press D 20 times. This duplicates the shape 20 times. (If you hold down D instead of pressing it 20 times, it is more difficult to judge how many copies you have made.)
Step Four: Rename the shapes in the selection pane so they are easier to recognize.
Step Five: Move your shapes and rename them. Change all the circles labelled 0 to 20, 19, 18, 17, 16, 15 etc.
Step Six: Select all the shapes and go to the animation ribbon. Select the exit (red) animation called clear (disappear). Open the animation pane and make sure the animations are in descending order. (20, 19, 18, 17, 16, 15 etc.) If they are not, just drag them to move them up the list.
Step Seven: When you right-click on an animation in the animation pane you have three choices.
- On click of – You need to click with the mouse for the animation to happen.
- Start with previous – The animation happens at the same time as the animation before it. If there are no animations before it, then the animation will be automatic when that slide is viewed.
- Start after previous – The animation won’t happen until the animation before it has been completed.
Option 3 works well if you only have the numerical timer. Number 20 will be the first animation, select start with previous. A 0 will appear next to it and the animation will be automatic. With all the following animations select start after previous and set the animation delay to 01:00 (1 second).
This mean the first animation will be automatic, the second animation will be one
second later (+1 second delay), the third animation will be two seconds later
(+1+1 seconds delay) and the fourth animation will be three seconds later
(+1+1+1 seconds delay).
Option 3 doesn’t work well if you combine a numerical countdown with a wheel timer or a bar timer.
In this case use option 2 and make sure you select start with previous for all animations. The example video shows option two.
Number 20 is the first animation. Set the animation delay to 00.25 (25 centiseconds or a 1/4 of a second).
(If the first animation is set to 00.00, you may not see the number 20 when the slide starts)
Number 19 is the second animation. Set the animation delay to 01.25 seconds (1 second and a 1/4 of a second).
Number 18 is the third animation. Set the animation delay to 02.25 seconds (2 1/4 seconds).
Number 17 is the fourth animation. Set the animation delay to 03.25 seconds (3 1/4 seconds).
Number 16 is the fifth animation. Set the animation delay to 04.25 seconds (4 1/4 seconds).
Although you have told PowerPoint to start all the animations at the same time with option 2, by making the delay progressively bigger for each animation you create a 1 second delay between each animation.
(If 0 doesn’t need an animation, remove it.)
Step Eight: Stack all the circles on top of each other, with 20 at the top and 0 at the bottom. You can do this by moving each circle with the mouse, or you can align objects. Select all the objects and go to format ribbon. Select align objects and click on align objects center followed by align objects middle (with the align select objects option checked.) All of the shapes will now be stacked on top of each other.
Step Nine: Drag a box around all the shapes with the mouse to move them. If you click on the top shape, you will only move the top shape. Move the countdown timer to where you want to position it on the slide.
Step Ten: Start your presentation. Your timer will automatically start and the numbers will appear to countdown from 20 to 0.
Extra Tips
Creating longer timers
The animation duration is used for the wheel, bar and hour glass timers. The animation duration is set in seconds, so:
A one-minute timer = 60 seconds
A two-minute timer = 120 seconds
A three-minute timer = 180 seconds
A four-minute timer = 240 seconds
A five-minute timer = 300 seconds
Change the animation duration to a larger number to create a longer timer.
The maximum number that can be typed into the animation duration box on the animation ribbon is 59 seconds.
This isn’t a problem. Open the animation pane. Right-click on your animation and select timing. In the timing dialog you can change the animation duration setting up to 10 minutes.
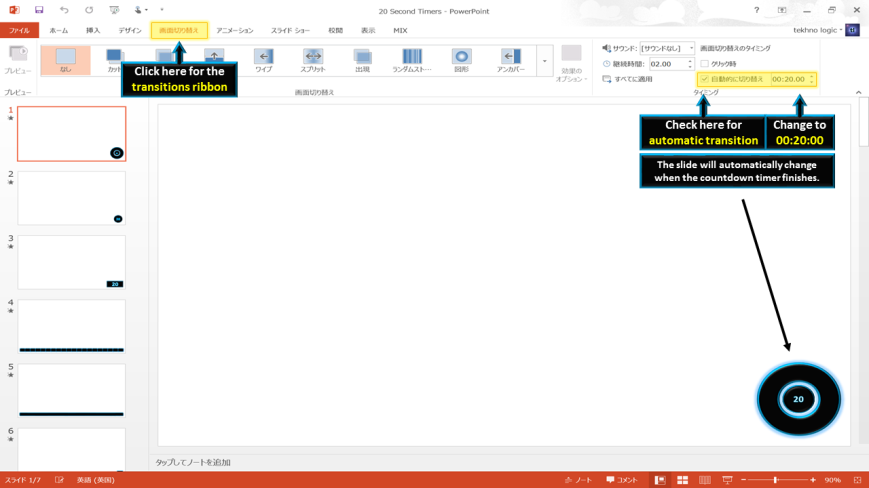
Automatic Transitions
When the countdown timer has finished you can move to the next slide manually (with the mouse or the keyboard) or by using automatic transitions.
Take a look at the screenshot below if you want to see an example of the automatic transition settings. If the countdown timer is 20 seconds, set the automatic transition for 20 seconds.
Contact tekhnologic if you have any more questions.
Take care!
You may also like to read:
An article about a timer I created for playing Countdown in the classroom. An adaptation of a TV Game show where students have 30 seconds to rearrange letters to form a word.

An article about video timers. PowerPoint timers that have been exported to video so that they can be easily inserted into presentations.
You may also like to watch these videos:
It isn’t a new technique to use animations and animation delay to create timers. In fact, there are several tutorials already available and in order to create the simplest timers possible, they all share similar designs. I hope that from the tutorials that I have produced you will have learned more about duplicating objects, aligning objects, working with the animation pane and the selection pane, and opening the timing dialog.
If you are looking for further information about producing timers, these videos may be useful.
This is a video tutorial produced by howtech.office. It shows you how to make a wheel animation timer with a numerical countdown.
This is a video tutorial produced by Eugene O’Loughlin. It shows you how to make a bar timer or a numerical countdown timer.
This is a video tutorial produced by Dave Foord. It shows you how to copy and paste timers into new presentations.

Interesting ideas. Thanks for sharing!
LikeLiked by 1 person
thanx alot
LikeLiked by 1 person
Nice article and great tutorial, but if you don’t want to work with multiple slides, shapes, etc. you might like PP Timer. It will save you quite some time in some cases. Just saying!
LikeLiked by 1 person
Hi Lennart,
Thanks for the comment and the recommendation. I’ll check it out at some point and link to it in the main article if it looks okay.
These timers were designed for a Pecha Kucha style event, so a timer on each slide was actually beneficial.
I sometimes use timers like this for specific games and activities, but otherwise I just use the timer on the presentation view.
The other benefit is that some school networks have security restrictions that don’t allow add-on or macro timers.
Cheers for the tip though.
T
LikeLike
Cool! You can email me if you want a demo.
LikeLiked by 1 person
Thank you! Very clear and helpful instructions
LikeLiked by 1 person
Does anyone know of a timer that can click down over multiple slides. I am trying to create a rolling powerpoint presentation during break times that would feature quotes and pictures from different people in my company. I would like to have a clock counting down so people could see how much time was left until the session was going to start again.
LikeLiked by 1 person
Did you ever find this solution? I need the same
LikeLiked by 1 person
Hi Robert and Colleen,
I don’t have a timer that can work across slides. The timer’s I have created are based on animations that need to be completed before PowerPoint moves onto the next. If you want a slideshow with several images with a timer, my suggestion would be to stack the images on top of each other (on one slide) and give each image a fade animation. That why it will appear as an image slideshow and you can use a simple timer on one slide.
Hope that helps.
T
LikeLike
HI Colleen,
Ay2m has suggested some timers, but there is only a free trial version available for download. To create longer timers, you may have to buy the product.
These timers are not endorsed by tekhnologic. We haven’t trued them, but someone from the community wanted to share the link.
Regards,
T
LikeLike
Thank you for your comment Aye2m.
Tekhnologic doesn’t host or promote third party products that have to be purchased.
As your comment was intended to help one member, I will host the links for a week, but after that time they will be removed.
Many thanks,
T
LikeLiked by 1 person
Hi Tekhnologic, thank you for letting me know.
LikeLiked by 1 person
Fantastic tips – the do-it-yourself circle timer is exactly what I was looking for. Thank you!
LikeLiked by 1 person
I, too, found a number of timer slides but nothing that I could layer over a rolling slide show.
LikeLiked by 1 person
Hi Bob,
the timer I created use animations provided in PowerPoint. Once you go to a new slide, PowerPoint will play the animations on that slide only.
If you want a timer to overlay over your entire PowerPoint presentation, it will need to either be written in VBA code or a separate program needs to be used.
T
LikeLike
thanks for the awesome video timer….much needed for my training sessions
LikeLiked by 1 person
Thank you! Just what I needed for my Pecha Kucha Presentation!
LikeLiked by 1 person
Love this! Are shape timers able to be set for longer than 59 seconds? Say, 2 or 3 minutes?
LikeLiked by 1 person
Yes, but I believe there is a maximum limit of 10 minutes. For longer timers, a different approach is required.
LikeLike