
Do you write your lesson plans in Word? Do you limit the amount you can write? Are your lesson plans easy to read? Are your lesson plans easy to complete? This post looks at five tips for lesson planning in Word.
A few days ago, Elly Setterfield (The Best Ticher) wrote an article called ‘planning on a daily basis‘ and in the article she posed the question: What do your lesson plans look like on a normal day-to-day basis?
Sandy Millin was the first ELT blogger to answer. She posted one of her lesson plans from last year and talked about how she arrived at her lesson style.
Both Sandy and Elly shared tips for planning by hand. As Elly noted:
Observation lesson plans are usually typed – easier to read, change, email, and reproduce. However most people I know normally plan their lessons by hand.
I have always used a combination of both digital lesson plans and hand-written lesson plans. The decision of what kind of lesson plan I use depends on the teaching context, how much preparation time I have and the lesson plan’s potential frequency of use.
But if you are making a digital lesson plan on a day-to-day basis, it is important to keep them simple, easy to read and easy to complete.
So, I have tried to take Elly and Sandy’s advice and apply it to writing a lesson plan in Word.
Tip #1 – Highlighting Text

Sandy commented that she highlights things that she tends to forget, things to check/clarify, answers and reminders to give rewards.
There are 15 colors to choose from when you want to highlight text.
- Go to the Home ribbon and click on the highlighter icon.
- Choose your color.
- Select your text to highlight it.
Tip #2 – Changing Case

Elly suggests using capital letters to make parts of your lesson plan stand out.
If you know what you want to emphasize, you can just press CAPS lock on your keyboard and every letter will be capitalized. However, if having already written the lesson plan you decide you wish to emphasize something, try using the change case feature in Word.
For example, you previously wrote a normal sentence with a starting capital letter followed by lowercase letters (Sentence case):
Write description of stage or activity here
And you want to capitalize all the letters so that the text appears like this:
WRITE DESCRIPTION OF STAGE OR ACTIVITY HERE
- Go to the Home ribbon.
- Select your text and click on the change case icon.
- Choose your case. For this example, choose UPPERCASE.
- The whole sentence will now be capitalized for emphasis.
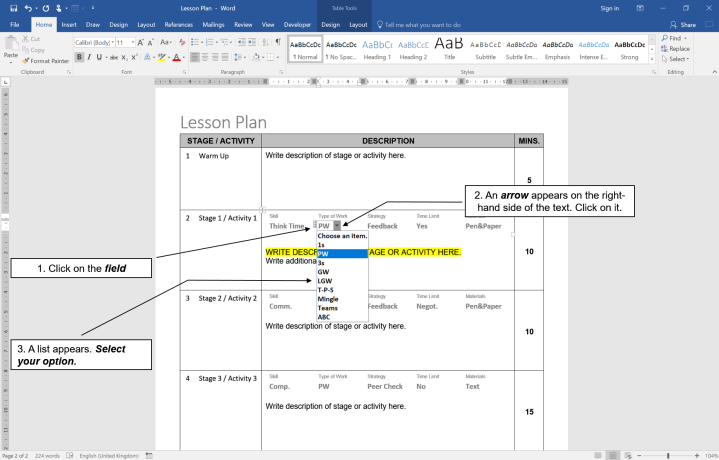
Tip #3 – Drop-down Lists
Elly also recommends using abbreviations, but says:
I have on occasion written things and then realised, when looking back, that I have no idea what my abbreviations mean. Choose something and then stick to it!
I think it would be fair to say that most teachers will use abbreviations in their lessons plans, and they can vary and change from time to time.
Microsoft Word has features that allow you to create your own forms. One of these features is to add a drop-down list.
With my digital lesson plans, I chose a series of keywords, abbreviations and categories (skill, type of work, strategy, time limits and materials) to summarize any activity. These keywords and abbreviations can then be selected from a drop-down list.
This means that my abbreviations are consistent across all my digital lesson plans.
These categories were derived from hieroglyphics for teachers.
How to Insert a Drop-Down List 
To insert a drop-down list, you need to use the developer ribbon. If you haven’t use the developer ribbon before, follow these steps:
- Click on file
- Click on options
- Click on customize ribbon
- Make sure that developer is checked in the right-hand window labelled main tabs.
- Click OK.
A new tab called developer should now be visible at the top of the screen. Click on it to see the developer ribbon.
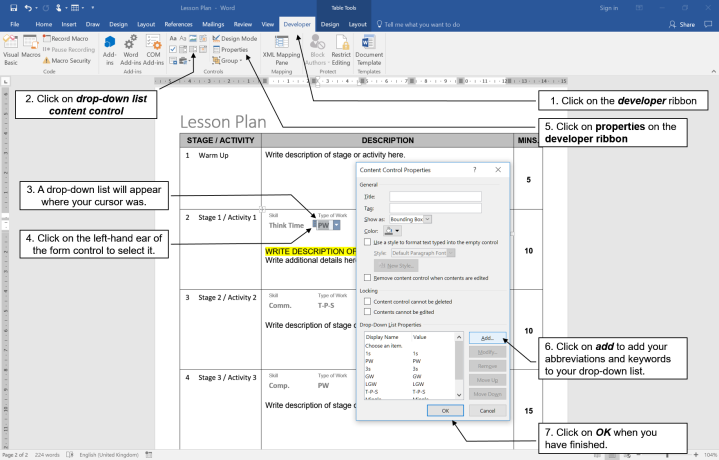
- Go to the developer ribbon
- There is a small group of icons in the middle of the ribbon
- Click on drop-down list content control
- A drop-down list will appear where your cursor was previously.
- Click on the left-hand ear of the form control to select it.
- Click on properties on the developer ribbon
- Click on add to add your abbreviations and keywords to your drop-down list.
- Click OK when you have finished.
Now whenever you click on your drop-down list, you can select your abbreviations. This will make it faster to complete your lesson plan.
Tip #4 – Comments

Comments are useful for reflecting upon the success of a lesson/activity.
- How long did the activity actually take?
- What worked well?
- What needed improvement?
- How did the students respond to the activity?
- What questions did the students have?
- What developments to the activity were there during the class?
These kinds of questions are especially useful to answer for lesson plans you know you will be using again. To insert a comment, follow these steps.
- Click on the insert ribbon.
- Select the text you want to add a comment to.
- Click on insert comment.
- A red box will appear on the right-hand side of the document. Type your comment into this box.
Tip #5 – Hyperlinks

If you are using online material as either the basis or as a supplement to your lesson, consider adding a hyperlink to that material in your lesson plan. The hyperlink can go to a website or to a folder on your computer.
If you re-use the lesson plan in the future, it may be that you can’t find a hardcopy of the material, and you have forgotten where you saved it.
However, a hyperlink will take you straight to it.
- Click on the insert ribbon.
- Click on hyperlink.
- Click on existing file or webpage.
- At the top of the dialog there is a field call text to display. You can write your text in here, or as is the case with my example, you can select some text in your document before you click on hyperlink.
- If you are using a website, copy the URL into the address field. Or browse through the folders on your computer to find your file.
- Click OK and your hyperlink will appear in your document.
These are my five tips for lesson planning in word.
Please leave a comment if you would like to share any ideas or suggestions.
Alternatively, you can send me a message by visiting the contact page, leaving me a message on my Facebook page or by following me on Twitter.
Thanks for reading and take care!
You may also like to read:

10 PowerPoint Tips for Teachers is an article I wrote back in June of 2015. It looks at several different features of PowerPoint that can help with both the preparation and presentation of a PowerPoint Check it out!
All images were designed with Microsoft Word 2016 and Microsoft PowerPoint 2016. Microsoft® Office® is a copyrighted product of the Microsoft® corporation. All images are for educational purposes only.

Thanks for writing this – I have to admit to not always being amazing at technology myself, so it’s nice to hear from someone who is good at it! 🙂
I’ve never used the drop-down list feature before on Word, but it seems like that could be really useful. Bookmarked for future reference!
Elly
LikeLiked by 2 people
Hi Elly, I’m glad you liked the post. Thank you for writing your original guide.
T
LikeLiked by 1 person
I too am impressed by the idea of drop down menus in LPs! So much to chew on here – no matter how you actually fabricate the plan! Thanks for the always valuable info and insight!!!
LikeLiked by 1 person
I’ve not used dropdown lists either. My solution to the abbreviations issue is to set them in autocorrect (Tools => AutoCorrect => Replace). I have dozens of items there now, such sts for students, pp for prepositional phrase, esp for especially, eg for e.g. and etc. It’s also good for names with diacritics, e.g. I type Janacek and it replaces it with Janáček, because I put that in AutoCorrect too. But I shall explore dropdown list. Thanks for the post. James.
LikeLiked by 2 people
Hi James. Thanks for reading the post. I am glad you like the idea of drop down lists. I like your idea of using the autocorrect function as well! T
LikeLike
Hi T,
Just to let you know that we’ve shortlisted this blog post for this month’s TeachingEnglish blog award and I’ll be putting up a post about it on tomorrow’s TeachingEnglish Facebook page http://www.facebook.com/TeachingEnglish.BritishCouncil, if you’d like to check there for comments.
Best,
Ann
LikeLike
Thanks, Ann!
LikeLike
Hi T,
Thanks for the mention and for the useful tips here. As with everyone else, the drop-down lists are a particular revelation.
Merry Christmas!
Sandy
LikeLiked by 1 person
would you mind to explain the definitions of skill, type of work, strategy, time limits?? thx
LikeLiked by 1 person
Hi Hansten,
They are just my categories to summarize any activity in a few words.
Skill refers to the four skills and their subcategories e.g. Listening, Gist, Comprehension and Detail.
Type of Works refers to the different kind of grouping. Individual, pair work, or group work.
Strategy refers to the kind of learning or feedback strategy I want to use.
Time limit refers to whether there is or isn’t a time limit and whether I am going to negotiate it with the students.
I hope that explains everything.
T
LikeLike