
Joanna Malefaki and I worked together on Color Blindness in the Classroom: Part 1 – Color Blind Friendly Charts. We tried to introduce ways to make charts and graphs to easier to read for all students. In this follow-up post, I want to talk about working with custom colors in Microsoft Office.
Color blindness is not the same for everyone. There are different forms and degrees of color blindness. One person may experience little to no difficulty working with color, while another person may find it difficult to distinguish shades of color.
Here is a brief introduction to color blindness by Joanna Malefaki from My ELT Rambles.
According to colourblindawareness.org/, 1 in 12 men and 1 in 200 women are colour blind and it is estimated that there is one colour blind student in every classroom!
Seeing just black and white is extremely rare. Most people are red/green colour blind and more rarely blue. This does not mean that people confuse their reds and greens, it actually means that they have trouble seeing shades of these colors and colors that are formed with these colours.
– Joanna Malefaki
You may also want to watch this video from colorblindawareness.org. It’s part of their #1ineveryclassroom campaign and it’s been made to help people understand the difficulties faced by color blind students. Although it is more for teachers of young leaners, I think it is worth watching regardless of the age group you teach.
Working with Colors in Microsoft Office
Microsoft Office commonly includes Excel, PowerPoint and Word. These programs have common features, so that if you can work with shapes and colors in one program, you can do the same in the others. For my examples, I am going to be talking about PowerPoint because it is with this program that teachers and students work with colors and shapes more when they are designing their presentations.
Creating objects and shapes
When you create any sort of shape in Microsoft PowerPoint, you can change its color from the options in the format ribbon. Just click on your object, go to the format ribbon and click on shape fill. The shape fill menu contains both theme colors, which change with each template or theme, and standard colors.
However, the standard colors are not labeled and it can be easier to assign a color to an object by using its RGB values. This way, you know exactly what color you are selecting.
 RGB Values
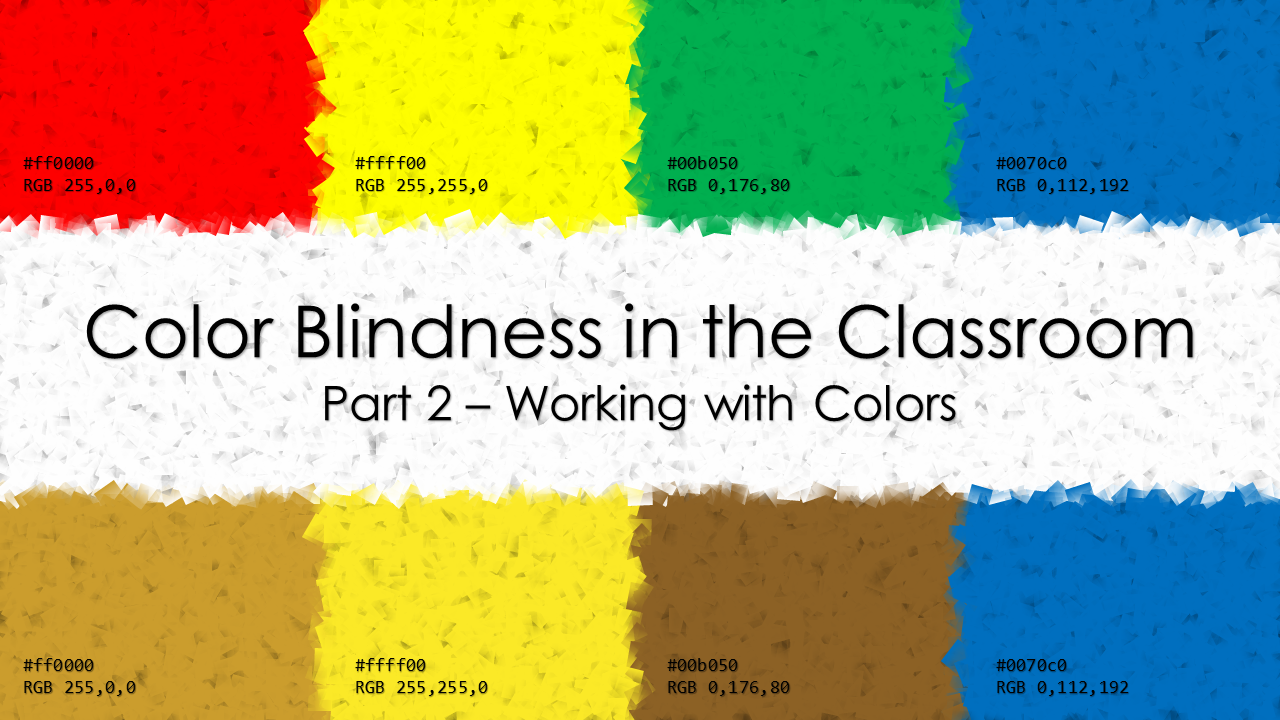
Colors are a combination of Red, Green and Blue.
If the Red value is set to 255, the Green value is 0 and the Blue value is 0, then the resulting color will be a bright red.
Why? Because the RGB value of black is 0,0,0, but the RGB value of white is 255,255,255. This means that the closer you get to 0, the darker the color will be. And the closer you get to 255, the brighter or lighter the color will be.
The table above shows the RGB values for the standard colors in PowerPoint.
Some people prefer using Hex Codes to RGB values though.
Hex Codes
“I google say, ‘hex code for light pink’ and I don’t have to worry that my colour will be wrong. I don’t know if hex codes apply to PPT though.”
Hex Codes is the short form for Hexadecimal Codes, which are a combination of numbers and letters that represent colors. You can see a comprehensive list of colors, their names and their hex codes here.
Unfortunately, PowerPoint doesn’t give you the option to choose a color based on a Hex Code, but because Hex Codes work in a similar way to RGB values, it is easy to convert them.
How do Hex Codes work?
The answer is in the name. Hexadecimal Codes consist of three parts and each part uses a 16-base number system that uses 9 numbers with the additional 6 numbers being represented by the first 6 letters of the alphabet.
I don’t want to go into too much detail about Hex Codes other than to say that each part of a Hex Code represents a Red value, a Green value or a Blue value. So, converting an Hex Code to RGB values only takes a little math.
(N1 x 16) + N2 = X
- Let’s look at the value ff.
- The letter f represents the number 15.
- The first value (f=15) is multiplied by 16 because it is a 16-base number system.
- The second value (f=15) is then added.
- The result is the RGB value.
ff = (15 x 16) + 15 = 255
No one really wants to do the math every time they want to change a shapes color in PowerPoint when there are much easier ways.
You can click on a Hex Code in this list and you can see the equivalent RGB values.
Alternatively, can use this conversion table below.
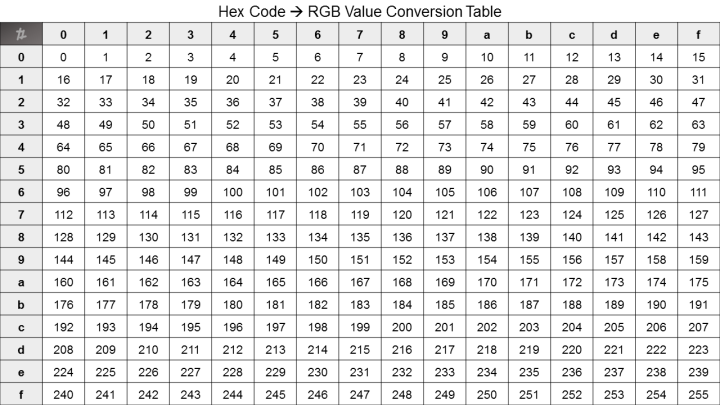
- Let’s look at the value 8c.
- Find the row labelled 8 on the left-hand side.
- Move your finger across until you reach column c.
- The square where row 8 and column c intersect is the RGB value (140).

You can also work backwards and covert an RGB value into a Hex Code. Just choose your three RGB values and write down the row and column headings for each of the three parts.
Alternatively, you can try using an online converter like this one here.
Selecting Custom Colors
Now that we have converted hex codes into RGB values, we can apply the color to shapes and objects in PowerPoint.
- Click on your object and go to the format ribbon.
- Click on shape fill and select More Fill Colors.

- Click on the custom tab in the colors dialog.
- Enter your RGB values and you can preview your color in the new box before clicking OK.
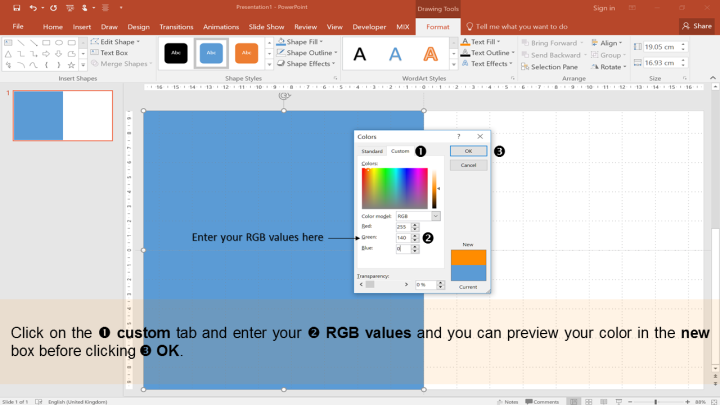
- Your object will be the exact color that you wanted.

Screen Tips
Some programs don’t use RGB values or Hex Codes, for example OneNote only has an unlabelled color palette, which isn’t ideal for either color blind teachers or students.

There is a solution though.
Turn on Screen Tips to have the name of the color appear on screen when you move your mouse over it.
Screen Tips work with all Office programs, so you can use them to identify colors from the format ribbon in PowerPoint, Word and Excel as well.
 To Activate Screen Tips
- Go to file and selection options.
- The PowerPoint Options dialog will open.
- Stay on the General options page and under User Interface Options you will find Screen Tip Styles.
- Showing feature descriptions in Screen Tips – When you hover your mouse over a menu, icon or feature, the Screen Tip says what it is as well as providing a brief description of it.
- Don’t show feature descriptions in Screen Tips – When you hover your mouse over a menu, icon or feature, the Screen Tip says what it is without providing a brief description of it.
- Don’t show Screen Tips – No hints are shown when you hover your mouse over a menu, icon or feature.
This short video illustrates how screen tips appear when you move your cursor over the color palette.
Note: In Office 2013 you could change the language the screen tips. In Office 2016 this option is no longer available. In order to change the language of the screen tips, you have to change Microsoft Office’s display language.
I hope this post has offered some useful tips for working with colors. If you have any ideas or suggestions, please leave a comment.
Alternatively, you can send me a message by visiting the contact page, leaving me a message on my Facebook page or by following me on Twitter.
Thanks for reading and take care!
You may also like to read:
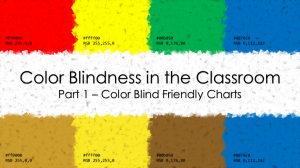
Color Blindness in the Classroom Part 1 looked at different ways of customizing charts and graphs to make them easier to read for color blind students and easier to present as a color blind teacher.

Screen Tips differ a little between Office 2013 and Office 106. This post explains about activating Screen Tips in Office 2013 and how to change the Screen Tip language.
I see yellow, you see blue is a post from My Elt Rambles about color blindness in the classroom and talks about some low-tech approaches that can help your students.
The example images and tutorial videos were made with Microsoft® PowerPoint® 2016 and Microsoft’s Snipping Tool.
They are being used for non-commercial and educational purposes only.
Microsoft® Office® is a product of the Microsoft Corporation.

Wow! This is great!I am turning on my screen tips! Thanks T!
Jo
LikeLiked by 1 person
No problem Joanna,
I’m glad you found this post useful.
We’ll have to put our heads together and think of some material for Part 3. 🙂
T
LikeLiked by 1 person
Sure!!
LikeLiked by 1 person
Awesome solution to a the issue!
LikeLiked by 1 person