

Last week I read a post called ‘Let’s ban PowerPoint in lectures – it makes students more stupid and professors more boring.’ The author also described PowerPoint as being:
“Not fit for teachers.”
Both of these statements are likely to generate a lot of debate and even though the author has led a move to ban on PowerPoint in the classroom and lecture hall, he can’t be as strongly adverse to PowerPoint as these statements would suggest because he says:
“We do allow lecturers to use it to show images and videos as well as quotes from primary authors.”
However, he prefers that the main content should be given with a ‘chalk and talk’ approach because with PowerPoint there is less improvisation, teachers read their bullet points off the screen and while students may take them as authoritative fact, it bores them at the same time. The author also mentions that students used to complain about the PowerPoint presentation not being shared before the presentation.
After reading with the article, I was left with this image of the author’s experience of presentations in my head.
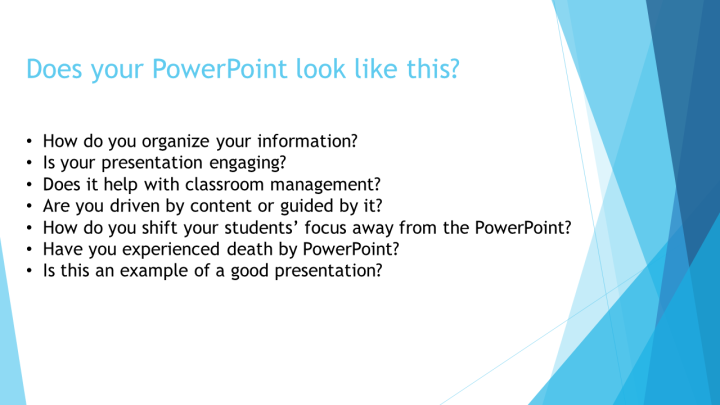
I would argue that if your PowerPoint presentation looks like this, the problem isn’t with the presentation software.
I completely agree with Joanna Malefaki’s response to the PPT debate. PowerPoint is a tool, and how useful that tool is largely depends on how familiar we are with the software. I think learning how to use a tool is a better approach than just simply banning it.
Marisa Constantinides wrote a great post called CELTA and Technology – With or Without it? It was partly about introducing PowerPoint skills into the CELTA course and the reactions to it. I think that it is a good idea to introduce trainee teachers to presentation software, so that if they choose to use it as a tool in the classroom, they can learn ways to use it effectively.
Then I came across this post by Sandy Millin. She also wrote about introducing technology into CELTA courses and commented:
“[I am] amazed at how many people, especially under 25s, are still petrified of PowerPoint and/or have never opened it in their lives!”
This anecdotal comment surprised me. So, rather than write a response to the original article, which claimed that PowerPoint wasn’t fit for teachers, I want to share a few tips and tricks for teacher trainees and experienced teachers who want to improve their presentations.
These tips are for content and improving presentation skills.
Tip #1 – Keep it Simple
Keep it simple. The best advice you will ever get when it comes to presentations. Yes, PowerPoint comes with default themes and wide array of transitions and animations but don’t let them detract from your content.
Some of the earlier presentations I created for use in the classroom used the default themes, but the default themes can be a visual reminder of presentations that your students have seen before, or they can employ a design which isn’t appropriate for your classroom. How do you think your students will respond to a default corporate design in PowerPoint?
I think it is better to have your own unique style, but keep it simple. I usually choose a single background color and apply it to all slides. If I have more time available, I will sometimes use a custom made design.

The same advice applies for transitions and animations. Yes, you can use elaborate and decorative transitions, and you add lots of animations. However, once they have been seen, they soon lose their appeal. You want your students or audience thinking that you have invested more time in the content of your presentation than you did in the design of it.
The other reason to keep it simple is that the more complicated you make something, the more chance there is for something to go wrong. This is especially true for people who use other presentation software such as Keynote and then try to run it in PowerPoint on a different computer. The conversion will change animations and formatting.
Having said that, it doesn’t mean that there isn’t a place for transitions and animations in your presentations. I recently wrote an article about Video Diagrams, which use animations as a method of instruction. Where animations have been used with an aim or purpose they can enhance your presentation, when they are being used purely for decorative purposes they can detract from it. Keep your design simple, but unique and your content will speak for itself.
Simplicity also works for your content and makes the difference between a presentation that is driven by content to one that is guided by content. If you have too much information in your PowerPoint, you aren’t creating as many opportunities for improvisation in class. If you have too little content, you are losing opportunities to offer support and help to the students. Between those two extremes there is a happy medium. Enough content that the students are guided by it, but not so much that they feel they can’t deviate from it and your presentations will generate conversation.
Tip #2 – Think of your students
It sounds like an obvious thing to say, but don’t use small text.
Think about the teaching space and where the furthest student from the screen will be. The further away they are, the larger your text should be. Walk around your classroom and make sure students don’t have to strain their eyes to read any of the text. If you have students who are finding it difficult to read the text on the screen, you can rearrange your seating plan or invite them to move closer the screen. Alternatively you can use the magnifier tool to zoom in on the text.
Zooming with keyboard shortcuts
Ctrl + will zoom in
Ctrl - will zoom out
Pressing Ctrl - beyond 100% zoom will show all slides.
ESC returns to 100% view.
Pressing ESC twice stops the presentation.
One other thing to consider is whether any of your students are color blind or not. Are you using a combination of colors that are difficult to read or see?
This post by Joanna Malefaki discusses color blindness in an educational setting and she mentions some color combinations to avoid. I can only describe it as an insightful read for teachers who don’t have any direct experience of how color blindness can affect the learning experience.
Tip #3 – Don’t read from the screen
Don’t read the screen!
It’s such an important thing not to do during presentations that it needs repeating. If your head is looking down at a computer screen or if your head is turned facing the projector screen you are not looking at your audience, which means you are not engaging with them.
One way to avoid this is not to write too much text on your slide and if you need additional prompts, write them in the notes section.
As you can see from the video, your notes from each slide will be visible in the presenter view. This is often the default view when you connect to an external monitor or projector. Look at your audience and only glance occasionally at your notes. They should only be prompts to jog your memory, not to be read word for word.
Tip #4 – Shifting focus
Your presentation doesn’t have to be the focal point for your students. If they are spending too much time looking at the screen, switch it off.
Press B to turn the screen to black
Press W to turn the screen to white
Press the same key again to return to the slide.
This isn’t a new technique. Ken Wilson has done seminar called ‘motivating the unmotivated’ where he uses a blend of technology, coursebooks and engaging speaking activities to help motivate students.
He switches of the screen to change the students’ focus or to get them involved in an information gathering activity.
The Information Gathering Activity
Write some sentences on the PowerPoint and number them. (If you write ten sentences, number them 1 – 10)
Assign each of the students in your class one of the numbers and ask them to memorize one sentence.
Switch off the screen by pressing B and ask the students to mingle and collect all the sentences.
When the students have finished, you can then turn the screen back on by pressing B and the students can compare their sentences to the originals.
I have tried this activity out many times and I have found it a great way to introduce, facts, conversations, and opinions. Turning the screen off can make the content of your presentation more memorable because the students have to take in the information rather than passively acknowledge it.
Tip #5 – Don’t point
Depending on the position of the projector screen you may find large parts of it are out of reach and if you are pointing in a vague direction, will your students mistake what you are pointing at? What to do?
You can try and jump to reach it, but that isn’t ideal especially in a professional setting. You could use a makeshift pointer like a ruler. You could go out and buy a laser pointer if you really wanted to spend the money, or you can just click on the laser pointer tool in PowerPoint and save yourself the money.
The laser pointer can involve the students in the presentation by guiding what they look at. By having the students read the text, describe the images, interpret what they see and offering hints to organize the information and the classroom you are involving them in the class and they no longer just passive listeners. Sometimes a little red dot can go a long way.
Below the laser pointer on the same menu is the pen tool to highlight areas of the screen or to make annotations on your PowerPoint.
The Pen tool performs best with a digital pen or a touch screen device.
One of the great things about the pen tool is that it allows me to make annotations and add students’ answers or ideas to a presentation. These annotations can also be saved with the presentation. If you don’t have a touch screen or digital pen, this tool will be less useful for you.
However, there is a way to show live typing during a presentation but it is a technique that requires its own tutorial, so I will write about it another day.
Tip #6 – Skipping Slides
We don’t always get to teach everything that we want to or that we set out to do. When it comes to presentations there are generally two kinds of people. The people who frantically keep clicking to skip a big section of their presentation and the people who do it seamlessly without the audience being aware of it. Which kind of person are you?
It’s worth learning a few tips and tricks for Navigating PowerPoint, but my top tip is Number+Enter. It’s very useful if you need to skip animations and slides and it avoids all the unnecessary clicking.
5+Enter = Takes you directly to slide number 5
22+Enter = Takes you directly to slide number 22
When you need to skip several slides, don’t resort to panicked clicking, just use this quick keyboard shortcut and your audience will never know there was another section to your presentation.
Tip #7 – Use SmartArt
I have mentioned before about using SmartArt in a previous post called 5 Tips for Creating Activity Instructions in PowerPoint, but it is also useful for explaining information.
In this short video, I use SmartArt to create a ‘pyramid of time’ used to explain the different prepositions we use to talk about time. The pyramid of time gets wider as the period of time gets longer.
I have also used SmartArt to create clines and timelines to explain points of grammar, but it can also be used to create board games. A suggestion I picked up from this tweet by Sandy Millin.
You can make board games using Smart functions on Microsoft says Suzanne Goodwin #Ihtoc7 (and they look very pretty, says I)
— Sandy Millin (@sandymillin) May 8, 2015
The reason SmartArt has made this list because there are other ways to present information other than bullet points and numbered lists. Explore different ways to present your lessons and find what works for you.
Tip #8 – Photo Galleries
Teacher’s lives are very busy and we often don’t have the time to do all the things we like. PowerPoint is great for showing images in class, but creating presentations can be time consuming and often seen as a low priority because our time could be used better to do something else.
If I wanted to show several pictures I used to have to insert the picture, re-size it, drag and move it in position before creating a new slide and repeating the process. When I explored the ‘photo album’ function, I quickly realized how much time I was wasting.
When you create a photo album, it inserts all the pictures for you and arranges them on different slides.
There are a number of different activities that might use pictures like this. Picture dictations, where one student describes an image to a partner or picture stories, where the students take a series of pictures and try to construct a story about them. They can also be used to generate a discussion or lead in to a topic.
Try ELTpics for a great selection of images to use in the classroom. The moral of this story is that by exploring PowerPoint I learnt something new, which turned out to be a faster way of doing something.
Tip #9 – Office Mix
I have written about Office Mix before, but I thought it was worth mentioning again as PowerPoint was described as ‘not fit for teachers.’ Office Mix is a free add-in for PowerPoint that allows educators to make more interactive presentations and on the website, Microsoft say:
“Office Mix was created with educators in mind”
Office Mix allows you to include quizzes and polls into your presentations, record a presentation with video narration to help you flip the classroom and it allows you to video capture what is on your screen – giving you the ability to create your own tutorial videos.
Many of the videos on this site are created using Office Mix.
Because your Mixes are stored on your account, you are given a link so they can easily be shared via social media, e-mail or linked to from a blog or a website. Making is easy for your students or audience to preview the material before class or to review it after class.
Tip #10 – It’s good to share
I briefly mentioned about sharing in tip #9, but there are other ways to share. Aside from sites like slideshare and online storage like google drive and dropbox, there are ways you can share the material in class. In fact, your presentation can really become an interactive experience if you don’t mind using mobile phones in the classroom.
I have written about using QR codes and taking photographs before. With QR codes your students or the audience can scan a code to receive a link to the presentation. Alternatively you can ask them to photograph key slides. At the moment I am enjoying using Office Lens for taking photos of material in class.
Office lens can take a photo of a blackboard / whiteboard or projector screen and straighten the image so that it is not skewed. Then, if you have a Microsoft account, you have the option to convert the image into a Word Document or PowerPoint document for editing. If you don’t you can save it as image, convert it as a PDF file or e-mail it to yourself. This handy little app means you will be able to photograph hand-written notes, a whiteboard or capture a key slide in a presentation for review later.
To sum up, here are my top ten tips for using PowerPoint in the classroom.
Keep it simple. Think about your students. Don’t read from the screen. Learn how to shift your students’ focus. Don’t point – there are better ways. Learn how to navigate like a pro. Use SmartArt – be creative in the way you present information. Explore PowerPoint – you’ll find features that save you time. Check out Office Mix for more features, and there are a lots of ways to share. The burden isn’t on you.
Leave a comment on the site if you have any other tips or suggestions for using PowerPoint in the classroom.
Alternatively you can send me a message on my Facebook page or on Twitter.
Thanks for reading and take care!
Featured Image made using a photo taken from http://flickr.com/eltpics, used under a CC Attribution Non-Commercial license, http://creativecommons.org/licenses/by-nc/3.0/ The images used in the Photo Galleries video belong to the author of this post.

Hi T.,
First of all, thanks so much for the mention. Secondly, this is an amazing post (defo going in June’s favourites) and thirdly, now I have to look into all the sites and fun stuff you mentioned about the PPT. So, more things on my TO DO list :D. I use PowerPoint in class but not always. I am not that happy with my PPT design but I think that will improve the more experienced I get.
I have also been reading about presentation skills a lot (there is a book called ” Presentation Zen” . really like it). I think that designing a fabulous PPT will not be enough if you can’t connect it with whatever phenomenon you are teaching/presenting.
Anyhow, great post. As always.
Joanna
LikeLiked by 1 person
Hi Joanna,
Thanks for the kind words and for taking the time to read it. 🙂 It took a while to bring everything together. I completely agree with you, the design of a presentation is only half the work. Learning how to deliver it and building a relationship with your audience is really important. As you say, if you can’t connect, you will produce an excellent PowerPoint but a mediocre presentation. However, the human side of presenting comprise another set of skills and probably deserve their own post. I would love to hear your thoughts on it.
Thanks again for reading and for the book recommendation!
T
LikeLiked by 1 person
I think that Powerpoint with all its animated templates, animations, transitions , add-ons and interactive features allows teachers to be creative and effective..
LikeLiked by 1 person
Hi Stella,
Thanks for taking the time to read my post. I agree with you that PowerPoint can be useful, but because it is a good it all depends on how it is applied. I have seen it used well, and badly.
Thanks for leaving me a comment 🙂
T
LikeLiked by 1 person
Powerpoint is undoubtedly a great tool for delivering presentations. However, as educators we should remember that this is what we are doing when we expect students to look at a projector screen and listen whilst we talk. I think the problem identified in the initial post is that teachers find themselves teaching for the entire lesson in this way. Maybe that is okay for some subjects, but for languages this is surely not ideal. The point then is not don’t use powerpoint, but remember that these parts of a lesson are teacher-centred, and should not form more of the lesson than necessary – less is more!
We can also use powerpoint to put up images, text or other useful aids to scaffold activities which are happening away from the powerpoint. I will try using the B and W keys to turn off the presentation when it might interfere with the activity.
Office Mix also sounds useful and I will have a look, but it doesn’t seem to suggest anything that can help hand over the control to students in a formal lesson setting. Though for supporting extra study outside the classroom I can see it’s application.
Someone once said about songwriting that if you write a song that sounds good on acoustic guitar, it will sound great on electric. I think we can apply this same theory to lesson planning – if the lesson could succeed without powerpoint, then it is probably a good lesson. Then powerpoint can be used to enhance it with visuals, audio, and short points of explanation. Powerpoint should not BE the lesson.
LikeLike
Hi awoliets,
Thanks for reading and for sharing your thoughts.
Are teachers not presenting with a ‘chalk and talk’ approach? There is always some degree of presentation or input in a lesson regardless of the way it is being presented.
(Bear in mind that the initial post was written from a lecturer’s perspective)
However, I think a PowerPoint is only teacher-centered if it is designed that way, because they also can lead to more student autonomy.
Office Mix could also be excellent for student project work. Creating narrated presentations which can range from academic presentations to digital story books.
As for me, I agree with you. PowerPoint shouldn’t be the lesson. I teach with and without technology in varying contexts.
But I think a lack of training in how to use presentation software to enhance classes results in the kind of problems the initial article talks about and perpetuates the stereotype that it is a teacher talking at his students.
Thanks again for your comments. You’ve given me something to think about for a future post 🙂
T
LikeLike
Photo Album????? Photo Album!!!! What a great time saver, just my luck I find out about it after I’m not using power point so much. I can’t tell you the regret I feel knowing the hours spent doing dozens and dozens of powerpoint could have been shortened. But thank you so much for bringing it to my attention.
I started using powerpoint on my CELTA, Put it on auto play add some music and it’s a wonderful schemata activator. I used it for my final CELTA lesson and for the teach using a song assignment. After my CELTA I created powerpoints to cover much of the Cambridge Young Learners’ Starters vocabulary. As you say as a vocabulary presentation tool at lower levels it’s excellent. Choose interesting pictures , use a little video as well, and it beats chalk and talk hands down. Take pictures of your students doing things, use them as questions – what is X doing?
LikeLiked by 1 person
Hi Retfer. No problem. I’m happy when anyone takes something away from my posts that they can use in the future. Thanks for sharing your thoughts and for reading my blog. Take care 🙂
LikeLike
Hi T,
Thanks a lot for the mentions and for the great list of tips. I’ve learnt about B/W, the number keys and the photo album function from it, and I’m sure if I go back I’ll find out more! I did my ‘Using technology’ input session yesterday, and I always include a slide which says ‘Powerpoint is your friend’. I’ll now be sending my trainees this post to help them realise how useful it can be!
Sandy
LikeLiked by 1 person
Hi Sandy,
Thank you for the kind words and I really enjoyed reading your post about CELTA and technology.
I’m glad some of my tips have been useful and I’m flattered that you want to introduce my post to your trainees. Thank you.
‘PowerPoint is your friend’ – that would be a great title for a post and if you ever have the time, it would be great to pick your brain about aspects of PowerPoint your trainees would like to learn about.
T
LikeLike
I think the main thing is how to introduce it to complete newbies who have no idea what PowerPoint can actually do for them. If people have a vague idea then they can search to find out how to get it to do what they want, but if they have no idea what PowerPoint actually is or how to use the basics (not unusual in my experience – I tend to have at least 1 person on each course like this) then it’s difficult for them to know where to start.
Sandy
LikeLiked by 1 person
Hi Sandy,
Thanks for your insights. They have definitely given me an idea for my next post.
Thanks for the inspiration.
T
LikeLike
A great post – well-made arguments and practical advice. I have been using PowerPoint for years but did not know about the B/W or laser pointer features…
One other ‘complaint’ I hear from teachers about using PowerPoint is that they have problems setting up at the start of class – they say that when they open the file and start the slide show the whole thing appears in edit mode allowing the students to see all the slides and the only way around it is to extend the screen which confuses them. When I show them that they can right-click on the file and select ‘show’ they are dumbfounded…
I wrote my own post about this a few years ago (one of my first ventures into the world of blogging – http://www.teachingvillage.org/2010/09/22/getting-the-most-out-of-power-point-by-david-dodgson/) and still maintain, as you do, that it is all about how you use it. One slideshow can even be utilised for an entire lesson without boring the students to death. It’s the same for almost all applications of technology in class really – it needs to be integrated into a lesson and not dominating it if it is to work well.
LikeLiked by 1 person
Hi Dave,
Thanks for sharing your post. I really enjoyed reading it and I have shared it on the tekhnologic Facebook page as well. 🙂
I know what you mean. One thing teachers should look out for is to make sure the ‘show presenter view’ option on the slide show ribbon is checked. This defaults to the extended screen and shows the presenter view (current slide, next slide, notes and timer) when connected to another monitor. And as you say, it can be manually selected by right-clicking on the slide.
I have also found the keyboard shortcut ‘windows key+p’ to be extremely useful. It’s opens up the projection options making it extremely easy to choose between view types.
Thanks again for your post. One of my interests at the moment is using PowerPoint for classroom management. I’d love to hear more of your ideas for integrating PowerPoint and how you use it.
LikeLiked by 1 person
Reblogged this on Ово је портфолио Соње Шумоња and commented:
uvek je dobro nauciti nesto novo
LikeLike
Hey, you used to write magnificent, but the last several posts have been kinda boring… I miss your great writings. Past several posts are just a little out of track! come on!
LikeLike
Hi Tom,
I don’t know what to say to that really.
Recently, I have been very busy. I can only work on this site in my spare time, so I can’t always spend as much time as I would like when writing an article.
If you have any suggestions for future topics though, please feel free to voice them and I’ll see what I can do.
Regards,
T
LikeLike
Hi T,
I’m pretty sure that was a spam message. I’ve had similar things on my blogs, and when you look at the emails they’re normally advertising. I don’t think you have anything to worry about!
Sandy
LikeLiked by 1 person