The way you give instructions is what makes or breaks an activity in the classroom. Using graded language, gestures and clear modelling help, but recently I have been producing diagrams in PowerPoint.
I started doing this because although I try and do my best to be clear, I will occasionally see a few confused looks with certain activities. Especially in the beginning when students are still getting used to my accent and my way of teaching. I decided that I would try and use diagrams more when I model an activity.
You often see diagrams as a teacher. You see them in activity books, the teacher’s book and occasionally in the students’ course books. The downside is that they can take time to draw and label in the classroom and you can usually explain the activity verbally within that time.

However, if you are using PowerPoint in the classroom, they only take a few minutes to prepare and even if you don’t have PowerPoint, you may still have an overhead camera. Printing out a copy before you go to class can help students visualize your instructions.
I used the diagram above in a class, and because I used it in PowerPoint, the circles rotated in the direction I wanted the students to move. It was one of those wonderful moments when there was an air of instant understanding in class and everyone got it at once.
I have also used diagrams with comprehension check questions (CCQs) to help students work out the instructions for themselves. I am hoping that these diagrams will eventually turn into a picture menu of different activities that have been done in class.
Here are my five tips for creating activity instructions in PowerPoint.
Tip #1 – Use SmartArt
SmartArt is a feature of Microsoft Office that allows you to select pre-designed diagrams and graphics to present information in a visual way.

The SmartArt feature is available in Word, PowerPoint and Excel. The icon looks like a green arrow with a white box on top of it.

In PowerPoint, it is available on the insert ribbon and is shown as a large icon. In Word and Excel, it is still on the insert ribbon, but it is a smaller icon.

Click on the icon to open the SmartArt galley. From here you can select any diagram or graphic to represent the instructions you want to give.
Once you have selected your graphic, you can edit it and customize it to suit your needs.
Tip #2 – Use the alignment options
Sometimes SmartArt doesn’t have a diagram or graphic that you can adapt. In this situation you would need to create your own, but creating your own diagrams and graphics would take more time without using the alignment options.
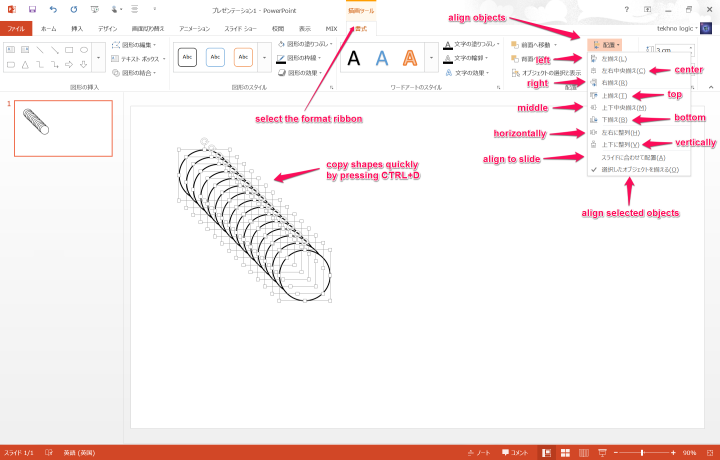
For example, creating a line of circles is relatively easy. Insert a circle and duplicate it several time by pressing Ctrl+D. Select all the objects and select the format ribbon. Click on align objects and choose your desired alignment.
Click on middle and all the shapes will be stacked on top of each other in the middle of the page. Go back to align objects and click on horizontally and the circles will be spaced evenly in a line. Copy the line the you have two lines facing each other.
It is worth playing around with the alignment options, because you can align the objects on the slide or to other objects. By becoming more familiar with them you can create your own custom diagrams in just a few clicks.

Tip #3 – Create custom shapes
When you are creating your own diagram or graphic there are plenty of shapes to choose from. However, if the shape you need isn’t there, you can always create custom shapes.

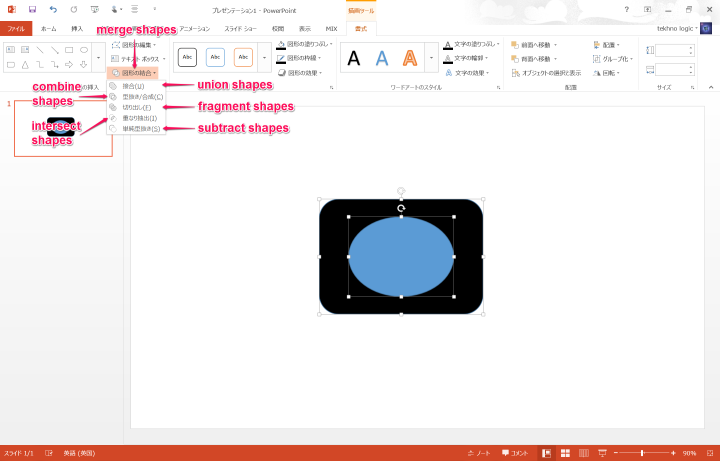
Creating your own shapes is quite easy. Select your shapes and explore the different options in the merge shapes menu.
The merge shapes menu is available on the format ribbon on the left-hand side.
There are five options to choose from.
Union Shapes – Unites all the shapes into one object.
Combine Shapes – Deletes the overlapping area.
Fragment Shapes – Separates the overlapping area into a second object.
Intersect Shapes – Delete the areas that don’t overlap.
Subtract Shapes -Deletes the overlapping area and the overlapping shape.
Paraphrased from PowerPoint On Demand 2013 by Steve Johnson, QUE Publishing. 2013
Tip #4 – Insert symbols
Adding symbols to your SmartArt or to your shapes can be a great addition when you are labeling your diagram.

In this diagram there is a symbol of a someone speaking to indicate the student who is dictating and there is a symbol of a pencil to show the student who should be writing.
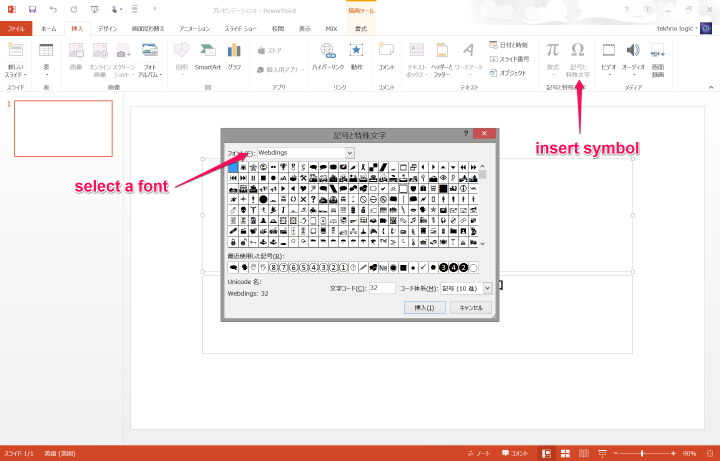
Many of these symbols are supplied with the default fonts of your PC. Usually you will have the following fonts installed:
Webdings; Wingdings; Wingdings 2; Wingdings 3
These four fonts provide plenty of symbols that can be used to help you annotate a diagram.
Go to the insert ribbon, click on symbol, and select your font in the drop down list at the top of the dialog box and click on insert.

Tip #5 – Use animations to show movement
Animations can be applied to shapes and to SmartArt alike.
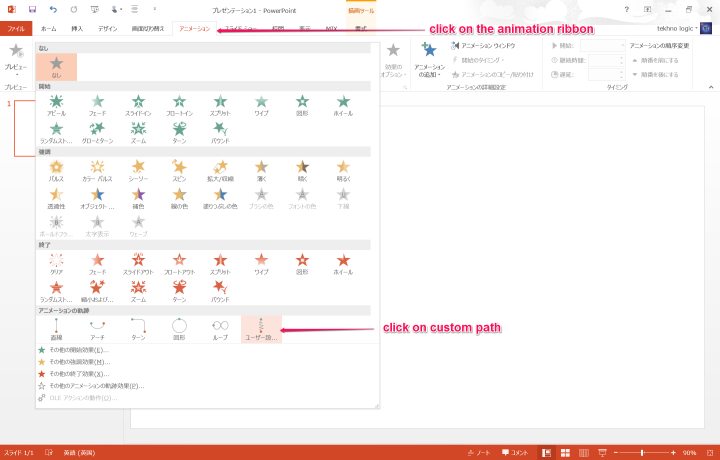
There are several animations in PowerPoint to choose from, but one that I think it very helpful but highly underused is the custom path animation.
This animation allows you to move any shape in almost any way on the page. I have previously used this animation to illustrate a running dictation. Where the circle moved along the arrow to the word list and returned back to the group.

As I mentioned earlier in the post, when the circles rotated on the screen, the students understood the activity almost immediately. I don’t use these diagrams to replace modelling, verbal instruction or a dry run of the activity, but I think they are a good way of conveying the meaning of your instructions in a visual way.
Students hear the instructions, they see the instructions and then they practice the instructions.


Very helpful post. Powerpoint skills are a must for the modern classroom. Thank you
LikeLiked by 1 person
Thanks. I’m glad you found it helpful. 😀 I completely agree with that core ICT skills are essential as technology takes a more prominent role in our daily lives.
LikeLike
Reblogged this on TEFL Training College and commented:
Powerpoint skills are an absolute must for the modern EFL/ESL classroom.
LikeLiked by 1 person
A YouTube tutorial would definitely be helpful for those who are not so tech savvy.
LikeLiked by 1 person
Hi Paul. Thanks for reading! I appreciate that videos help and I do create video tutorials for my website. However, I decided against it for this article because it entirely depends on what kind of diagram you are planning to produce, which is why I went with the five tips format. I also had time constraints last weekend. However, if you have a specific activity that you like, let me know what it is and I will try to create the diagram and record a video of how it was made. Is that OK?
LikeLike
I’ve always thought I was pretty good at using Powerpoint, but never knew about the alignment or merge shapes options – thanks for introducing me to them!
Sandy
LikeLiked by 1 person
Hi Sandy, and thanks. I’m glad you’ve found something useful in my ramblings. 🙂
LikeLike